When an Outlook app is installed on your computer, you can use it to move email, contacts, and calendar items from one email account to another.
For example, let’s say an employee is going to leave your company, you would like to attached his/her email/contacts to your outlook. So, the best way must be exporting the email and contacts to a offline pst file and then copy over to your computer.
Office 365: Export Outlook items to a .pst file
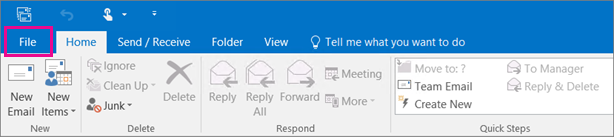
- At the top of your Outlook ribbon, choose File. If your ribbon doesn’t have a File option in the top left corner, see What version of Outlook do I have? to determine your version of Outlook and find the appropriate export instructions.
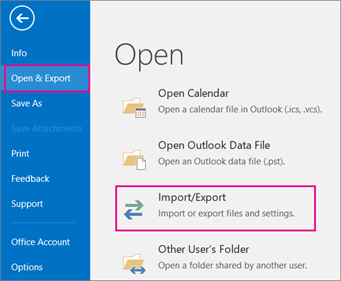
- Choose Open & Export > Import/Export.
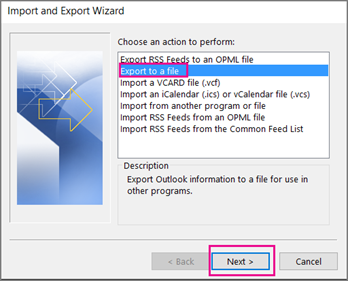
- Choose Export to a file.
- Click Outlook Data File (.pst)> Next.
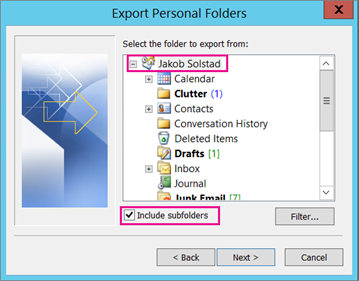
- Select the name of the email account to export, as shown in the picture below. Only information for one account can be exported at a time. Make sure that the Include subfolders check box is selected. This ensures that everything in the account will be exported: Calendar, Contacts, and Inbox. Choose Next.
- Click Browse to select where to save the Outlook Data File (.pst). Enter a file name, and choose OK to continue. Note: If you’ve used export before, the previous folder location and file name appear. Type a different file name before choosing OK.
- If you are exporting to an existing Outlook Data File (.pst), under Options, specify what to do when exporting items that already exist in the file.
- Choose Finish.
- Outlook begins the export immediately unless a new Outlook Data File (.pst) is created or a password-protected file is used.
- If you’re creating an Outlook Data File (.pst), an optional password can help protect the file. When the Create Outlook Data File dialog box appears, enter the password in the Password and Verify Password boxes, and choose OK. In the Outlook Data File Password dialog box, enter the password, and choose OK.
- If you’re exporting to an existing Outlook Data File (.pst) that is password protected, in the Outlook Data File Password dialog box, enter the password, then choose OK.
Now that your Outlook data is in a .pst file, it’s portable. You can save the .pst file to OneDrive, then download it to your new computer. You can also save to a portable drive, then import your email, contacts, and calendar to Outlook.
Outlook 2010: Export Outlook items to a .pst file
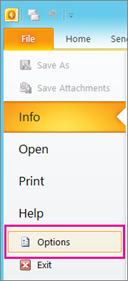
- At the top of your Outlook ribbon, choose the File tab.If your ribbon doesn’t have a File option in the top left corner, see What version of Outlook do I have? to determine your version of Outlook and to get to the right export instructions.

- Choose Options.
- In the Outlook Options box, choose Advanced.
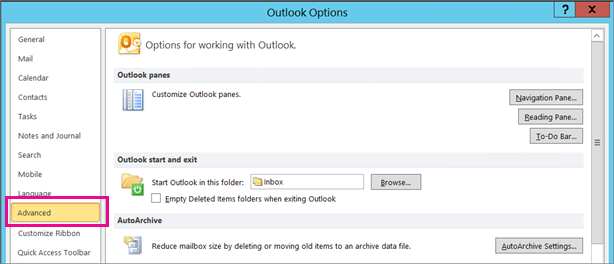
- Under the Export section, choose Export.

- Choose Export to a file, then Next.
- Choose Outlook Data File (.pst), then Next.
- Select the name of the email account to export, as shown in the picture below. Only information for one account can be exported at a time. Make sure that the Include subfolders check box is selected. This ensures that everything will be exported: Calendar, Contacts, and Inbox. Choose Next.
- Choose Browse to select where you want to save the Outlook Data File (.pst) and to enter a file name. Select OK to continue. Note: If you have previously used the export feature, the previous folder location and file name appear. Make sure that you change the file name if you want to create a new file instead of using the existing file.
- If you are exporting to an existing Outlook Data File (.pst), under Options, specify what to do when exporting items that already exist in the file.
- Choose Finish.
- The export begins immediately unless a new Outlook Data File (.pst) is created, or if the export is to an existing file that is password protected.
- If you are creating a new Outlook Data File (.pst), an optional password can help protect the file. When the Create Outlook Data File dialog box appears, enter the password in the Password and Verify Password boxes, and then choose OK. In the Outlook Data File Password dialog box, enter the password, then choose OK.
- If you are exporting to an existing Outlook Data File (.pst) that is password protected, in the Outlook Data File Password dialog box, enter the password, and then choose OK.
Now that your Outlook data is in a .pst file, it’s portable. Save the .pst file to OneDrive, then download it to your new computer. Save it to a portable drive to carry anywhere, then import your email, contacts, and calendar to Outlook.
What data is exported?
- When Outlook exports email, contacts, and calendar info to a .pst, it makes a copy of the information. Nothing leaves Outlook. You’ll still see and have access to your email, contacts, and calendar in Outlook.
- When Outlook exports emails, it includes any attachments to the emails.
- Outlook does not export meta-data such as folder properties (views, permissions, and AutoArchive settings), message rules, and blocked senders lists.
Important: If you’re using Cached Exchange Mode, Outlook will only export the items in your current cache. By default, your cache contains items from the past 12 months. To export more than the past 12 months of data, turn off Cached Exchange Mode first.
Ref: https://support.microsoft.com/en-us/office/export-or-backup-email-contacts-and-calendar-to-an-outlook-pst-file-14252b52-3075-4e9b-be4e-ff9ef1068f91