Azure Active Directory Domain Services (Azure AD DS) provides managed domain services such as domain join, group policy, LDAP, Kerberos/NTLM authentication that is fully compatible with Windows Server Active Directory. You consume these domain services without deploying, managing, and patching domain controllers yourself. Azure AD DS integrates with your existing Azure AD tenant. This integration lets users sign in using their corporate credentials, and you can use existing groups and user accounts to secure access to resources.
You can create a managed domain using default configuration options for networking and synchronization, or manually define these settings. This tutorial shows you how to use default options to create and configure an Azure AD DS managed domain using the Azure portal.
In this tutorial, you learn how to:
- Understand DNS requirements for a managed domain
- Create a managed domain
- Enable password hash synchronization
If you don’t have an Azure subscription, create an account before you begin.
Prerequisites
To complete this tutorial, you need the following resources and privileges:
- An active Azure subscription.
- If you don’t have an Azure subscription, create an account.
- An Azure Active Directory tenant associated with your subscription, either synchronized with an on-premises directory or a cloud-only directory.
- You need Application Administrator and Groups Administrator Azure AD roles in your tenant to enable Azure AD DS.
- You need Domain Services Contributor Azure role to create the required Azure AD DS resources.
- A virtual network with DNS servers that can query necessary infrastructure such as storage. DNS servers that can’t perform general internet queries might block the ability to create a managed domain.
Although not required for Azure AD DS, it’s recommended to configure self-service password reset (SSPR) for the Azure AD tenant. Users can change their password without SSPR, but SSPR helps if they forget their password and need to reset it.
Important
You can’t move the managed domain to a different subscription, resource group, or region after you create it. Take care to select the most appropriate subscription, resource group, and region when you deploy the managed domain.
Sign in to the Azure portal
In this tutorial, you create and configure the managed domain using the Azure portal. To get started, first sign in to the Azure portal.
Create a managed domain
To launch the Enable Azure AD Domain Services wizard, complete the following steps:
- On the Azure portal menu or from the Home page, select Create a resource.
- Enter Domain Services into the search bar, then choose Azure AD Domain Services from the search suggestions.
- On the Azure AD Domain Services page, select Create. The Enable Azure AD Domain Services wizard is launched.
- Select the Azure Subscription in which you would like to create the managed domain.
- Select the Resource group to which the managed domain should belong. Choose to Create new or select an existing resource group.
When you create a managed domain, you specify a DNS name. There are some considerations when you choose this DNS name:
- Built-in domain name: By default, the built-in domain name of the directory is used (a .onmicrosoft.com suffix). If you wish to enable secure LDAP access to the managed domain over the internet, you can’t create a digital certificate to secure the connection with this default domain. Microsoft owns the .onmicrosoft.com domain, so a Certificate Authority (CA) won’t issue a certificate.
- Custom domain names: The most common approach is to specify a custom domain name, typically one that you already own and is routable. When you use a routable, custom domain, traffic can correctly flow as needed to support your applications.
- Non-routable domain suffixes: We generally recommend that you avoid a non-routable domain name suffix, such as contoso.local. The .local suffix isn’t routable and can cause issues with DNS resolution.
Tip
If you create a custom domain name, take care with existing DNS namespaces. It’s recommended to use a domain name separate from any existing Azure or on-premises DNS name space.
For example, if you have an existing DNS name space of contoso.com, create a managed domain with the custom domain name of aaddscontoso.com. If you need to use secure LDAP, you must register and own this custom domain name to generate the required certificates.
You may need to create some additional DNS records for other services in your environment, or conditional DNS forwarders between existing DNS name spaces in your environment. For example, if you run a webserver that hosts a site using the root DNS name, there can be naming conflicts that require additional DNS entries.
In these tutorials and how-to articles, the custom domain of aaddscontoso.com is used as a short example. In all commands, specify your own domain name.
The following DNS name restrictions also apply:
- Domain prefix restrictions: You can’t create a managed domain with a prefix longer than 15 characters. The prefix of your specified domain name (such as aaddscontoso in the aaddscontoso.com domain name) must contain 15 or fewer characters.
- Network name conflicts: The DNS domain name for your managed domain shouldn’t already exist in the virtual network. Specifically, check for the following scenarios that would lead to a name conflict:
- If you already have an Active Directory domain with the same DNS domain name on the Azure virtual network.
- If the virtual network where you plan to enable the managed domain has a VPN connection with your on-premises network. In this scenario, ensure you don’t have a domain with the same DNS domain name on your on-premises network.
- If you have an existing Azure cloud service with that name on the Azure virtual network.
Complete the fields in the Basics window of the Azure portal to create a managed domain:
- Enter a DNS domain name for your managed domain, taking into consideration the previous points.
- Choose the Azure Location in which the managed domain should be created. If you choose a region that supports Azure Availability Zones, the Azure AD DS resources are distributed across zones for additional redundancy. TipAvailability Zones are unique physical locations within an Azure region. Each zone is made up of one or more datacenters equipped with independent power, cooling, and networking. To ensure resiliency, there’s a minimum of three separate zones in all enabled regions.There’s nothing for you to configure for Azure AD DS to be distributed across zones. The Azure platform automatically handles the zone distribution of resources. For more information and to see region availability, see What are Availability Zones in Azure?
- The SKU determines the performance and backup frequency. You can change the SKU after the managed domain has been created if your business demands or requirements change. For more information, see Azure AD DS SKU concepts.For this tutorial, select the Standard SKU.
- A forest is a logical construct used by Active Directory Domain Services to group one or more domains.
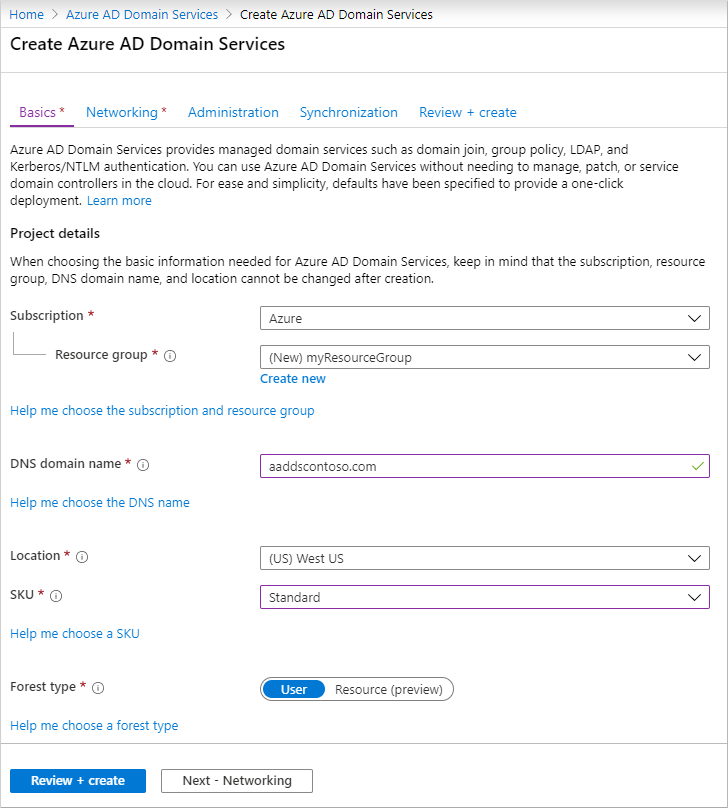
To quickly create a managed domain, you can select Review + create to accept additional default configuration options. The following defaults are configured when you choose this create option:
- Creates a virtual network named aadds-vnet that uses the IP address range of 10.0.2.0/24.
- Creates a subnet named aadds-subnet using the IP address range of 10.0.2.0/24.
- Synchronizes All users from Azure AD into the managed domain.
Select Review + create to accept these default configuration options.
Deploy the managed domain
On the Summary page of the wizard, review the configuration settings for your managed domain. You can go back to any step of the wizard to make changes. To redeploy a managed domain to a different Azure AD tenant in a consistent way using these configuration options, you can also Download a template for automation.
- To create the managed domain, select Create. A note is displayed that certain configuration options such as DNS name or virtual network can’t be changed once the Azure AD DS managed has been created. To continue, select OK.
- The process of provisioning your managed domain can take up to an hour. A notification is displayed in the portal that shows the progress of your Azure AD DS deployment. Select the notification to see detailed progress for the deployment.
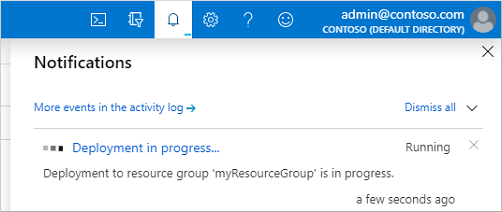
- The page will load with updates on the deployment process, including the creation of new resources in your directory.
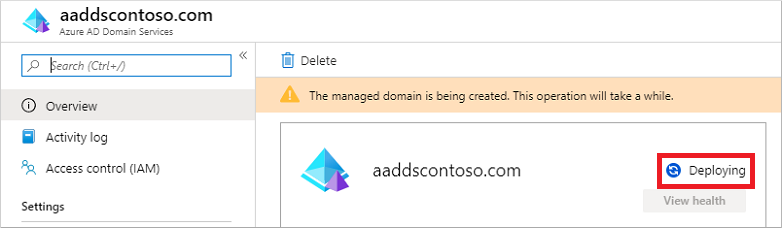
- Select your resource group, such as myResourceGroup, then choose your managed domain from the list of Azure resources, such as aaddscontoso.com. The Overview tab shows that the managed domain is currently Deploying. You can’t configure the managed domain until it’s fully provisioned.
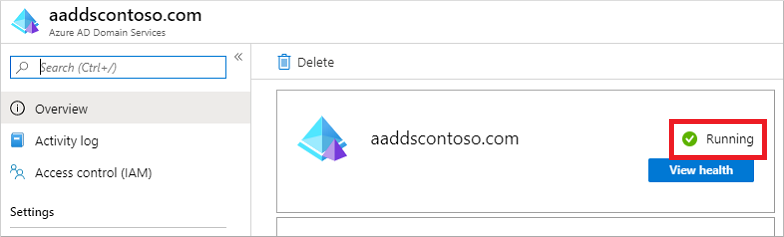
- When the managed domain is fully provisioned, the Overview tab shows the domain status as Running.
Important
The managed domain is associated with your Azure AD tenant. During the provisioning process, Azure AD DS creates two Enterprise Applications named Domain Controller Services and AzureActiveDirectoryDomainControllerServices in the Azure AD tenant. These Enterprise Applications are needed to service your managed domain. Don’t delete these applications.
Update DNS settings for the Azure virtual network
With Azure AD DS successfully deployed, now configure the virtual network to allow other connected VMs and applications to use the managed domain. To provide this connectivity, update the DNS server settings for your virtual network to point to the two IP addresses where the managed domain is deployed.
- The Overview tab for your managed domain shows some Required configuration steps. The first configuration step is to update DNS server settings for your virtual network. Once the DNS settings are correctly configured, this step is no longer shown.The addresses listed are the domain controllers for use in the virtual network. In this example, those addresses are 10.0.2.4 and 10.0.2.5. You can later find these IP addresses on the Properties tab.
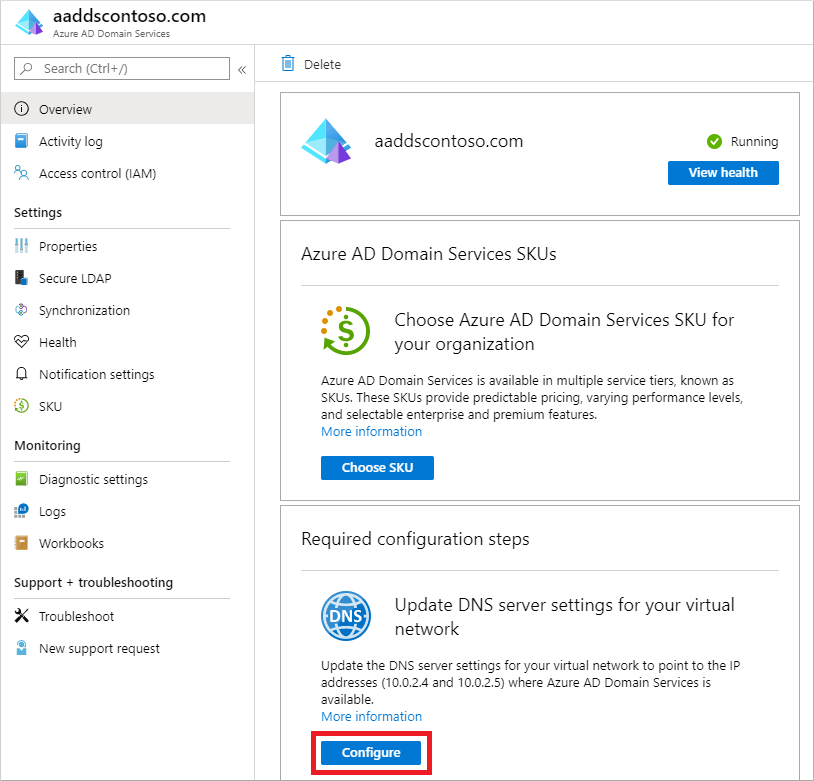
- To update the DNS server settings for the virtual network, select the Configure button. The DNS settings are automatically configured for your virtual network.
Tip
If you selected an existing virtual network in the previous steps, any VMs connected to the network only get the new DNS settings after a restart. You can restart VMs using the Azure portal, Azure PowerShell, or the Azure CLI.
Enable user accounts for Azure AD DS
To authenticate users on the managed domain, Azure AD DS needs password hashes in a format that’s suitable for NT LAN Manager (NTLM) and Kerberos authentication. Azure AD doesn’t generate or store password hashes in the format that’s required for NTLM or Kerberos authentication until you enable Azure AD DS for your tenant. For security reasons, Azure AD also doesn’t store any password credentials in clear-text form. Therefore, Azure AD can’t automatically generate these NTLM or Kerberos password hashes based on users’ existing credentials.
Note
Once appropriately configured, the usable password hashes are stored in the managed domain. If you delete the managed domain, any password hashes stored at that point are also deleted.
Synchronized credential information in Azure AD can’t be re-used if you later create a managed domain – you must reconfigure the password hash synchronization to store the password hashes again. Previously domain-joined VMs or users won’t be able to immediately authenticate – Azure AD needs to generate and store the password hashes in the new managed domain.
Azure AD Connect Cloud Sync is not supported with Azure AD DS. On-premises users need to be synced using Azure AD Connect in order to be able to access domain-joined VMs. For more information, see Password hash sync process for Azure AD DS and Azure AD Connect.
The steps to generate and store these password hashes are different for cloud-only user accounts created in Azure AD versus user accounts that are synchronized from your on-premises directory using Azure AD Connect.
A cloud-only user account is an account that was created in your Azure AD directory using either the Azure portal or Azure AD PowerShell cmdlets. These user accounts aren’t synchronized from an on-premises directory.
In this tutorial, let’s work with a basic cloud-only user account. For more information on the additional steps required to use Azure AD Connect, see Synchronize password hashes for user accounts synced from your on-premises AD to your managed domain.
Tip
If your Azure AD tenant has a combination of cloud-only users and users from your on-premises AD, you need to complete both sets of steps.
For cloud-only user accounts, users must change their passwords before they can use Azure AD DS. This password change process causes the password hashes for Kerberos and NTLM authentication to be generated and stored in Azure AD. The account isn’t synchronized from Azure AD to Azure AD DS until the password is changed. Either expire the passwords for all cloud users in the tenant who need to use Azure AD DS, which forces a password change on next sign-in, or instruct cloud users to manually change their passwords. For this tutorial, let’s manually change a user password.
Before a user can reset their password, the Azure AD tenant must be configured for self-service password reset.
To change the password for a cloud-only user, the user must complete the following steps:
- Go to the Azure AD Access Panel page at https://myapps.microsoft.com.
- In the top-right corner, select your name, then choose Profile from the drop-down menu.
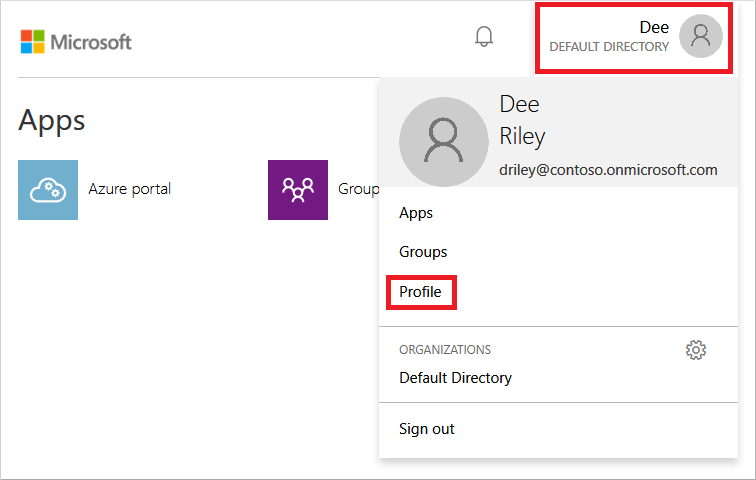
- On the Profile page, select Change password.
- On the Change password page, enter your existing (old) password, then enter and confirm a new password.
- Select Submit.
It takes a few minutes after you’ve changed your password for the new password to be usable in Azure AD DS and to successfully sign in to computers joined to the managed domain.
Ref: Tutorial – Create an Azure Active Directory Domain Services managed domain | Microsoft Learn