Quick Steps
How to enter Safe Mode in Windows 10 using “Shift + Restart” on the sign-in screen
- On the Windows 10 sign-in screen, press and hold the SHIFT key on the keyboard.
- With this key still pressed, click or tap the Power button and, in the menu that opens, click Restart.
- Windows 10 restarts and asks you to select an option. Choose Troubleshoot.
- On the Troubleshoot screen, go to Advanced options.
- On the Advanced options screen, choose Startup Settings.
- Finally, click or tap the Startup Settings option.
- Windows 10 says that you can restart your device to change advanced boot options, including enabling Safe Mode. Press Restart.
- After Windows 10 restarts one more time, you can choose which boot options you want to be enabled. Press the 4 or the F4 key on your keyboard to start Safe Mode.
How to start Windows 10 in Safe Mode
When you boot into Safe Mode in Windows 10, the operating system loads a minimal user interface, with only the essential services and drivers needed for it to function. This mode makes it easy to troubleshoot problems because it does not load things that can cause Windows to crash.
Windows 10 Safe Mode
If you do not want to read an extensive article with plenty of instructions, you can view the video below, which details four of the methods found in our tutorial:
If you want to know all the methods you can use to start Windows 10 in Safe Mode, read this tutorial to the end. First, we cover what to do when you can no longer log into Windows 10 and then what you can do when you log in to Windows 10. If you cannot log into Windows 10, read methods 1 to 4. If you can log in to Windows 10, read methods 5 to 8. The last method works only on computers with older hardware.
1. How to enter Safe Mode in Windows 10 using “Shift + Restart” on the sign-in screen
If you cannot log into Windows 10, but you can get to the sign-in screen, press and hold the SHIFT key on the keyboard. With this key still pressed, click or tap the Power button and, in the menu that opens, click Restart.
How to start Windows 10 in Safe Mode from the Sign In screen
Windows 10 restarts and asks you to select an option. Choose Troubleshoot.
Troubleshooting Windows 10
On the Troubleshoot screen, go to Advanced options.
Accessing the advanced troubleshooting options
On the Advanced options screen, choose Startup Settings. Depending on your Windows 10 computer, you may not see this option at first. If you do not, click or tap the link that says “See more recovery options.”
Advanced troubleshooting options
Finally, click or tap the Startup Settings option.
Windows 10 Startup Settings
Windows 10 says that you can restart your device to change advanced boot options, including enabling Safe Mode. Press Restart.

Startup Settings: Choose Restart for Windows 10 Safe Mode options
- Standard Safe Mode – press the 4 or the F4 key on your keyboard to start it
- Safe Mode with Networking – press 5 or F5
- Safe Mode with Command Prompt – press either 6 or F6
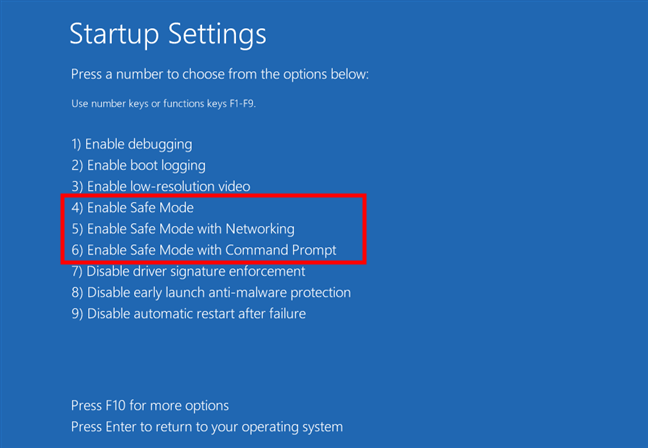
How to enter Safe Mode in Windows 10
Log into Windows 10 Safe Mode with a user account with administrator permissions, and perform the changes you want.
2. How to enter Windows 10’s Safe Mode by interrupting the normal boot sequence (three times in a row)
If Windows 10 fails to boot normally three times over, the fourth time, it enters by default in an Automatic Repair mode. Using this mode, you can boot into Safe Mode. To trigger the Automatic Repair mode, you must interrupt the normal boot process three consecutive times: use the Restart or the Power button on your Windows 10 PC to stop it during boot, before it finishes loading Windows 10. If you use the Power button, you might have to keep it pressed for at least 4 seconds to force the power off. When Windows 10 enters the Automatic Repair mode, the first thing you see is a screen that tells you that the operating system is “Preparing Automatic Repair.”

How to start Windows 10 in Safe Mode using automatic repair
Then, you may be asked to choose an account to continue. Choose an account that has administrator permissions.

Choosing an account to log in
Next, type the password of the selected administrator user account. If you are not prompted for this information, skip to the next step.

Entering the password of the user account
Wait for Windows 10 to try to make an automatic diagnosis of your PC.
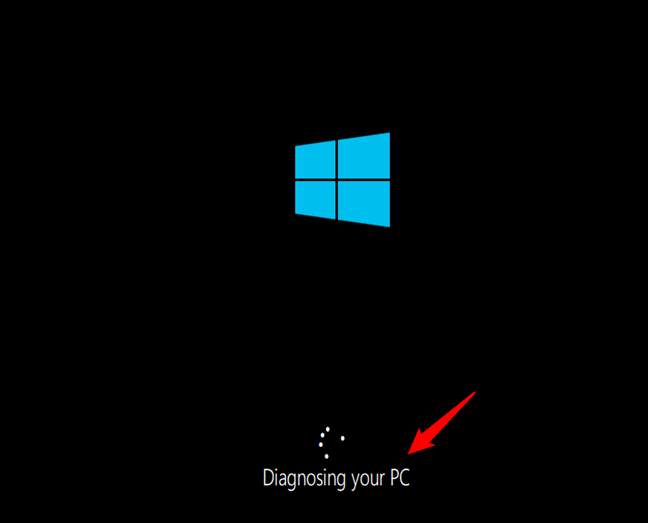
Diagnosing your Windows 10 PC
On the “Automatic Repair” screen, press the “Advanced options” button.

Accessing the advanced troubleshooting options
Then, choose Troubleshoot.
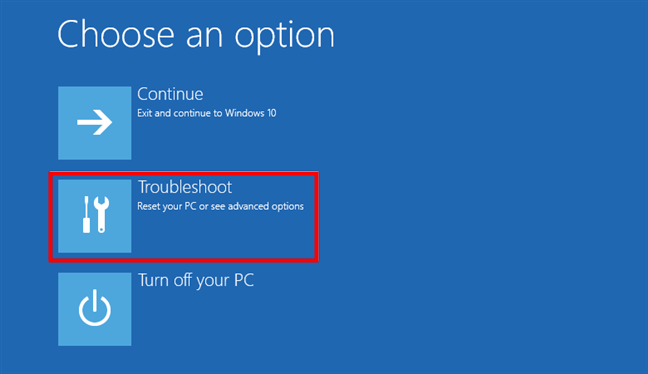
Troubleshoot Windows 10
From here on, the steps you have to take are the same as those shown in the first method from this guide. Follow the path “Advanced options -> Startup Settings -> Restart.” Then, press the 4 or the F4 key on your keyboard to boot into minimal Safe Mode, press 5 or F5 to boot into “Safe Mode with Networking,” or press 6 or F6 to go into “Safe Mode with Command Prompt.”
3. How to enter Safe Mode in Windows 10 using installation media and the Command Prompt
If you have a Windows 10 setup DVD or USB memory stick lying around, or if you can create one right now, you can use it to boot your broken PC with Windows 10 into Safe Mode. Then, boot your broken Windows 10 PC from it and wait for the installation environment to load. Choose the language and keyboard layout you prefer and click or tap Next.

The Windows 10 Setup
Click or tap on the link that says “Repair your computer” on the bottom left corner of the screen.

Repairing your Windows 10 computer
When asked what option you prefer, choose Troubleshoot.
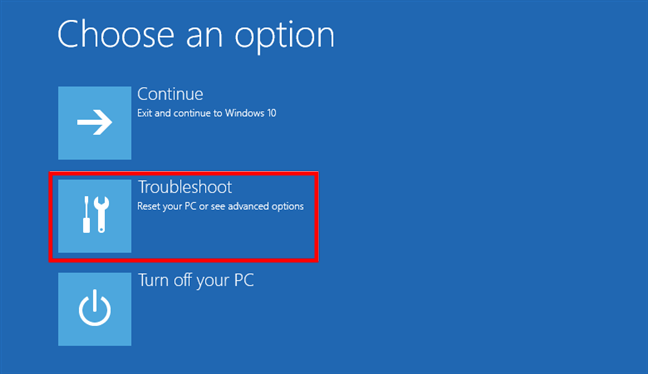
To get to Windows 10 Safe Mode, select Troubleshoot
On the “Advanced options” screen, click or tap “Command Prompt (Use the Command Prompt for advanced troubleshooting).”
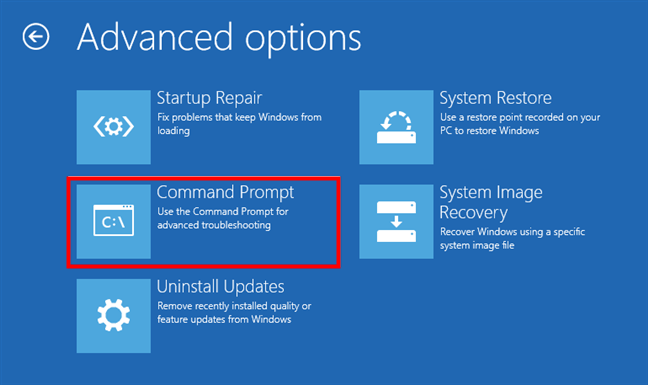
Starting the Command Prompt
Inside the Command Prompt window, type the command: bcdedit /set {default} safeboot minimal. Press Enter on your keyboard and, after a moment, it tells you that “The operation completed successfully.”
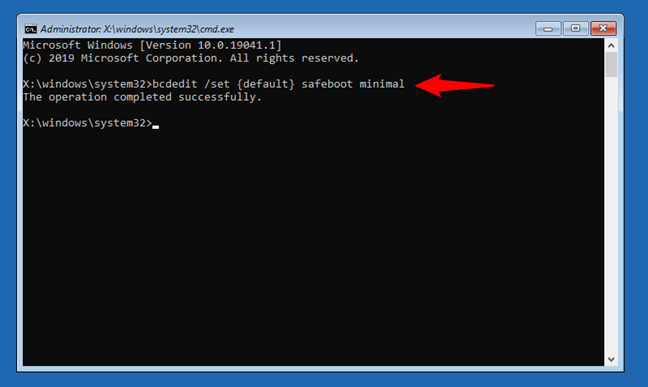
How to boot in Safe Mode from the Command Prompt
Close the Command Prompt and choose to Continue on the next screen.
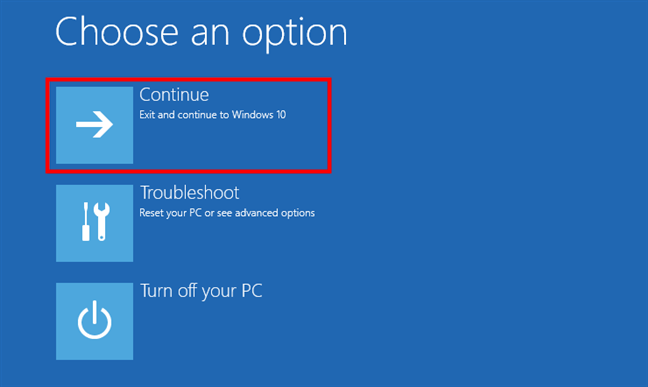
Choose Continue to start Windows 10 in Safe Mode
After your PC reboots, Windows 10 starts into Safe Mode. Log in with a user account that has administrator permissions, and perform the changes you want.
IMPORTANT: The problem with this method is that it tells Windows 10 to enter Safe Mode automatically, every time you start it, until instructed otherwise. To disable this setting and get Windows 10 to boot normally again, run the same procedure one more time and type the command: bcdedit /deletevalue {default} safeboot.
4. How to start Windows 10 in Safe Mode by booting from a recovery drive
In Windows 10, you can create a system recovery USB drive. Since your PC may not be working, create this USB recovery drive on another computer with Windows 10.

Creating a Windows 10 Recovery Drive
Once you have created a USB recovery drive, use it to boot your Windows 10 PC or device and, when you are asked to load its content, do so. The first screen asks you to choose the layout for the keyboard. Select the one you want to use, or if you do not see it listed, click or tap “See more keyboard layouts” to get the complete list of available layouts.

Choosing the keyboard layout for the recovery drive
After choosing the keyboard layout that you want to use, on the “Choose an option” screen, go to Troubleshoot.
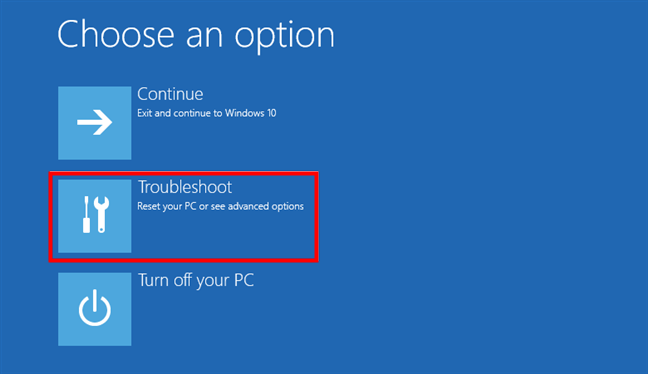
Choose Troubleshoot to get to the Windows 10 Safe Mode options
5. How to access Windows 10’s Safe Mode using System Configuration (msconfig.exe)
If you can log in to Windows 10, one of the easiest methods to boot into Safe Mode is to use the System Configuration tool, which users know by its file name: msconfig.exe. Open System Configuration: a quick way to do that is to enter the words ”system configuration” in the taskbar search field and then click or tap the System Configuration shortcut.
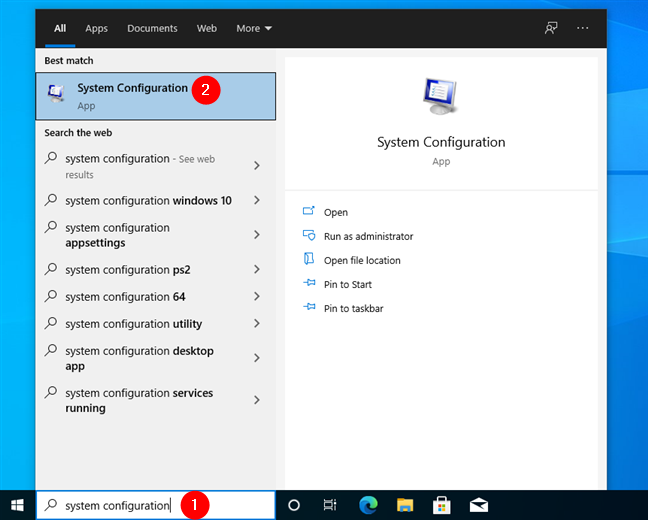
Searching for System Configuration (msconfig)
In the System Configuration window, click or tap the Boot tab. In the Boot options section, select the “Safe boot” option. Finally, click or tap OK.
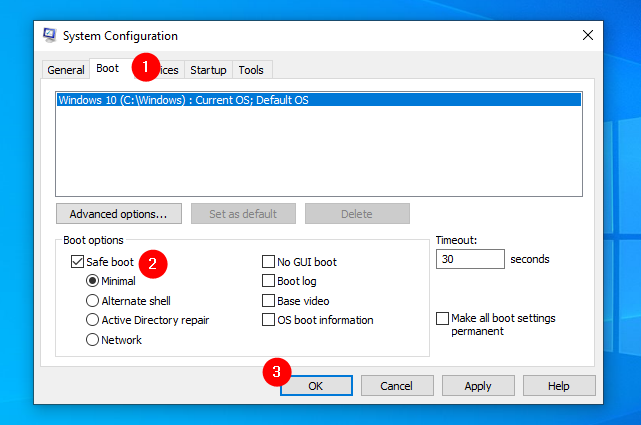
How to start Windows 10 in Safe Mode using System Configuration (msconfig)
Windows 10 tells you that you need to restart your computer for the new setting to take effect. If you still have work to do, you can select “Exit without restart.” If not, choose Restart to reboot Windows 10 in Safe Mode.

Restart Windows 10 in Safe Mode
Then, you get straight into Windows 10 Safe Mode.
6. How to start Windows 10 in Safe Mode by pressing “Shift + Restart” on the Start Menu
Another way of getting into Safe Mode in Windows 10 is to use the Start Menu. First, press and hold the SHIFT key on the keyboard. With that key still pressed, click the Start button, then Power, followed by Restart.

How to start Windows 10 in Safe Mode from the Start Menu
Windows 10 reboots and asks you to select an option. Choose Troubleshoot.
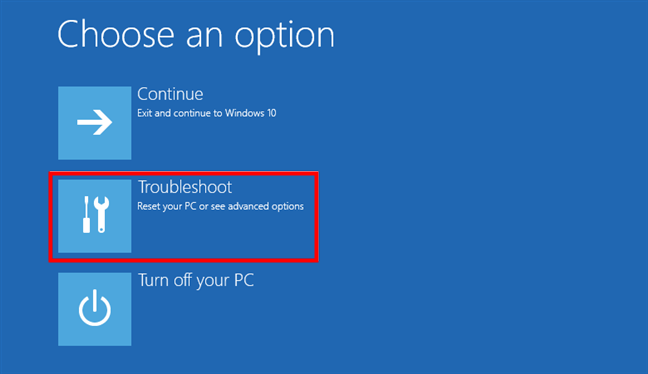
Click or tap on Troubleshoot to get to the Windows 10 Safe Mode settings
Next, you have to follow the same steps shown in this guide’s first method. In short, go to “Advanced options -> Startup Settings -> Restart.” Then, press 4 or F4 on your keyboard to start in Safe Mode, press 5 or F5 to boot into “Safe Mode with Networking,” or press 6 or F6 to go into “Safe Mode with Command Prompt.”
7. How to enter Windows 10’s Safe Mode from the Settings app (Recovery Advanced Startup)
If you can log into Windows 10, another way to boot into Safe Mode is from the Settings app. Open Settings (Windows + I) and head to the Update & security section.
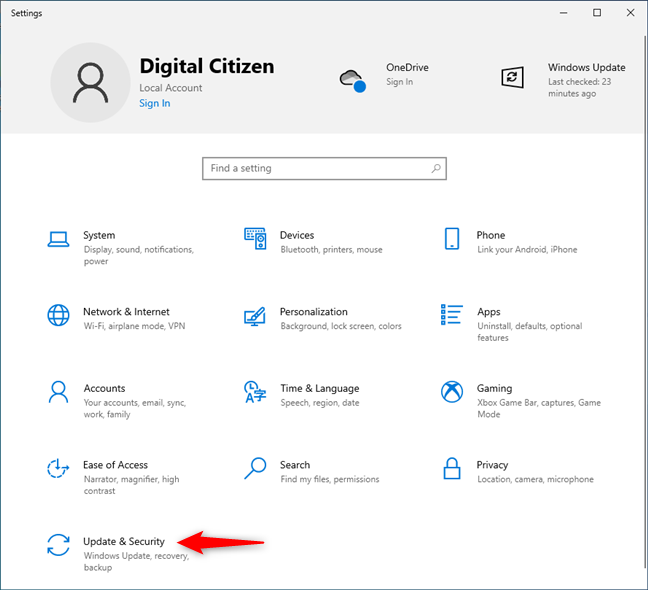
Update & Security in the Windows 10 Settings app
On the left side of the Settings window, press Recovery. On the right side of the app, in the Advanced startup section, click or tap the Restart now button.

Windows 10 Recovery options
After Windows 10 restarts, choose the Troubleshoot option.

Troubleshoot Windows 10: Reset your PC or see advanced options
Next, you have to follow the same steps as those shown in the first method from this guide. In short, go to “Advanced options -> Startup Settings -> Restart.” Then, press 4 or F4 on your keyboard to start in Safe Mode, press 5 or F5 to boot into “Safe Mode with Networking,” or press 6 or F6 to go into “Safe Mode with Command Prompt.”
8. How to start Windows 10 in Safe Mode using the shutdown command in CMD
The Command Prompt offers an alternative way of starting Windows 10 in Safe Mode. Open CMD and run the following command: shutdown.exe /r /o.

How to get to Windows 10 Safe Mode using the shutdown command
This makes Windows 10 restart into its recovery environment. After you run it, you are notified that Windows 10 will sign you out in less than a minute.

You’re about to be signed out
Once you’re signed out, Windows 10 loads the “Choose an option” screen, just like in the previous methods we’ve shown. Select Troubleshoot and follow the instructions illustrated in the first method of this guide. Go to “Advanced options -> Startup Settings -> Restart.” Then, press 4 or F4 on your keyboard to start in Safe Mode, press 5 or F5 to boot into “Safe Mode with Networking,” or press 6 or F6 to go into “Safe Mode with Command Prompt.”
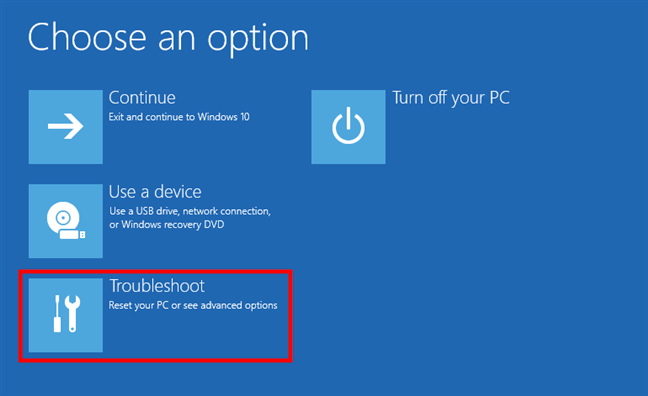
Choose Troubleshoot to reach the Windows 10 Safe Mode options
9. How to get to Windows 10’s Safe Mode with F8 or Shift + F8 (doesn’t work for UEFI BIOS and SSD drives)
Even if you’ve read the word BIOS in this method’s title, this isn’t a “how to boot in Safe Mode from BIOS” alternative. You can’t do that. On the other hand, in Windows 7, you were able to press F8 just before Windows got loaded, to open the Advanced Boot Options window, where you could choose to start Windows 7 into Safe Mode. Obviously, you might be wondering whether “Is F8 Safe Mode for Windows 10?” a valid option.
Some websites advise you to press Shift + F8 just before Windows 10 starts loading so that you make it launch the recovery mode, from where you can boot into Safe Mode. The problem is that most times, Shift + F8 and F8 do not work, even though they are correct commands supported by Windows 10.

How to enter Safe Mode in Windows 10 using Shift + F8
If you have a modern PC with a UEFI BIOS and a fast SSD drive, there is no way you can interrupt the boot procedure with your keypresses. With a classic BIOS and no SSD drive on older PCs, pressing these keys might still work though.
Ref: https://www.digitalcitizen.life/4-ways-boot-safe-mode-windows-10/